
The Room Adventure: Additional Features
Updating Color Schemes Dynamically
Difficulty: ★☆☆☆☆
Requirement: HTML upgrade
We have a user interface with a certain color scheme. Well, what if we adjusted the colors as the player plays the game? We could pick colors from each room image we're using and incorporate it into the UI. If a player earns points, we could show a certain color, or a different color if they lose points, and so on.
The problem we face is how complex we want to make the colorization. How many elements will we update? How many colors will be used for each update?
What we need to do
- Build a function that handles the color changes.
- Use a default color when no color is given.
- Add color properties to rooms where we want them.
- Add a call to the color function when the player moves into a room.
- Optionally add color updates for other actions, like earning or losing points.
Step 1: Set boundaries
This could get really out of hand, depending on how detailed we want to be. Think about all the different sections we have on our screen. It may not look like there's a lot, but there is. Here's a list. (Don't freak out.)
HTML Tags
- body (the webpage itself)
- table (the structure holding our game)
- td (table cell)
- h1 (main heading)
- h3 (smaller heading)
- button (and these have separate formats)
- img (room image)
- a (hyperlink anchor in the caption)
Style Classes
- .text (for most of the cells with text in them)
- .item (for the "take an item" button)
- .inventory (for the inventory buttons)
- .even (for the even numbered navigation and passcode buttons)
- .odd (for the odd numbered navigation and passcode buttons)
- .hide (for the backspace and clear buttons)
- .show (for the backspace and clear buttons)
Element Ids
- #interface (surrounds the whole game)
- #gameTitle (the game's title)
- #info (the game information box)
- #description (for room descriptions)
- #broken (for showing the broken things and other info)
- #found (showing found items and other info)
- #score (where we show the player's point total)
- #navigation (where we show the navigation, passcode, start, and replay (etc.) buttons)
- #imagewrapper (which helps control the room image display)
- #caption (to show the image's caption info, if you're using it)
- #inventory (to format the inventory box itself, not the buttons)
- Individual buttons: #start, #replay, #leave, #exit, #passcode, #backspace, #clear, #playerName, #hintButton
See? It's a lot! And those are just the ones we have from the features in the book and from what's on the website at the time I'm creating this particular page! Who knows what else has been added since?
If we really wanted to control for all of these things, we sure could. But it would take a lot of setup to do.
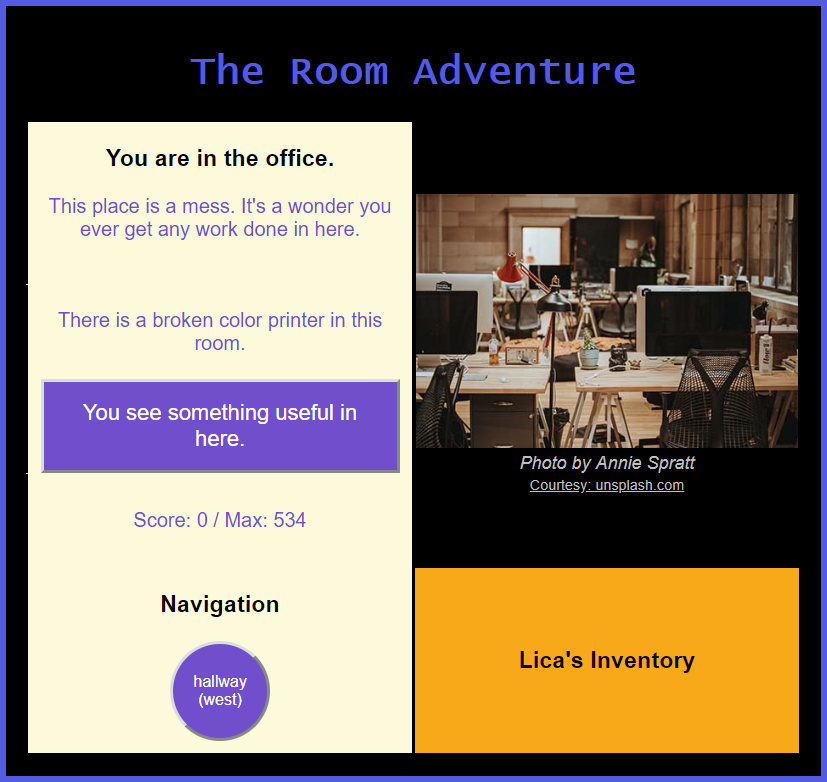
Instead, we're going to only change two things in this feature here, because we're narrowing things down. We are going to change the border color of the interface and the text color of the game title. If you want to do more, you certainly can!
Step 2: Creating our updateColors function
Because we're keeping things simple here, this function won't be too crazy. But I like to make sure our code won't run into any unexpected errors, so I want to check for and control for certain things.
To use this function, we'll need to pass in the color we want to use. We'll use it for both the title's text color and the border of the interface. If no color is sent in, then we want to use a default color.
Let's check out the function and I'll explain the rest of it after.
- function updateColors(color)
- {
- //if no color is sent in (undefined) then use a default
- color = color || "orange";
- var gameInterface = document.getElementById("interface");
- var gameTitle = document.getElementById("gameTitle");
- if (gameInterface)
- {
- gameInterface.style.borderColor = color;
- }
- if (gameTitle)
- {
- gameTitle.style.color = color;
- }
- }
Code breakdown
Let's talk a little about this code, or you can jump down to the next step.
Setting the default value
Right at the top, there's something that may look really weird. It's a JavaScript shortcut.
- color = color || "orange";
On the right of the = sign is where the magic happens. When we call this function, we are supposed to
send in a color for the parameter. We're going to add these to our rooms in a little bit.
Remember your logical operators? The OR operator || evaluates one expression at a time from left to
right until it hits something that is true. As soon as it hits something true, it stops checking.
Remember when you're testing if something is true? Any string that has a value is
considered to be true. So if we did pass in a color, then this line says to just use
that color parameter.
However, if we don't send in a color, then the color parameter would be undefined. In that case, the color part of the OR condition is false so the computer moves to the right and sends back our default color, which for me is
"orange". Whew.
I said this was a shortcut. What's it a shortcut for? Well, you could replace that line with this instead.
- if (!color)
- {
- color = "orange";
- }
Is that more readable to you? You can use that version instead if you like.
Picking and checking the elements we're changing
The document lines should look familiar from when we set up the big display object. That's how we use each element's id to find it and use it.
Then I'm being overcautious. I'm checking to make sure that both of those elements exist before trying to change their styles. Why? Just in case we change something in the UI at some point. We don't want our game crashing here. Or we could leave those checks out, let the game crash, and then backtrack to troubleshoot why it's crashing. Sometimes that's a good option too.
Setting the new styles
When we use JavaScript to change CSS styles, we have to make sure we are using the style property of the element we're changing.
But on top of that, we have to select the individual style property we want to update too. We chain the properties together to do this.
But there's a major difference in some CSS property names versus JavaScript names. Did you notice? In CSS, we use
attributes like background-color, border-radius, and font-size.
But these won't work in JavaScript because of the hyphen (minus sign). They don't follow the naming and punctuation rules of JavaScript. So any name that has
those hyphens in it has to be converted to camelCase. Therefore, background-color in CSS would become
backgroundColor when used in JavaScript code. We could use borderRadius,
fontSize, and so on.
We're only changing the borderColor of our interface and the font color of the title. We
could certainly do a lot more, but let's just get our feet wet here.
Step 3: Updating moveToRoom
We have our function. Now we have to call it. You remember that process, right?
At the top of our moveToRoom function, we have a number of function calls. Depending on what features you've added, that may be all that's in there. Go to the end of that section, right after we display the score and the inventory. That's where we're going to call the new function.
- display.score();
- showInventory();
- updateColors(player.currentRoom.color);
Why are we putting it at the end? Some of our interface elements, like the buttons and so on, are created dynamically. If we later added new styling for the inventory buttons, let's say, then we wouldn't see those changes if we tried to change the colors before the buttons are created. This helps to make sure everything is on the screen before we try to modify any of it.
Step 4: Updating other functions
While you're in the mindset of updating functions, why not take a run through your code an add other colors elsewhere? If you don't want to do that now, you can do it at any time. In that case, jump to the next step and start adding color properties to your rooms.
The way we wrote our function, we don't need anything special to change a color. We can just call the function and send in the name of the color we want to use, or even a hex value for a color.
I want the border and title to turn red whenever the player loses points. So anywhere I have
player.score -= I know I'm about to take
points away, no matter what's after the -=. Instead of combing through all the lines of code, I used
the find feature that's pretty standard on all computers. Press Ctrl+F and that usually gives you a dialogue box on your screen somewhere that will let you
search. I actually only searched for -= in this case. But because I broke my JavaScript into several
files, I had to search them all to make sure I didn't miss anything.
Right after any line of code where a player lost points, I called our new function and sent in the color "red".
For example
In my fixBrokenThing function, if the player uses the wrong item in a room, they lose 15 points. So, I want to change the color there.
- player.score -= 15;
- updateColors("red");
I also made used the red color if the player is tired and can't fix something, or if the player tries to fix something in a room that doesn't have anything broken in it. Also, if they get the passcode wrong, that's red-border-worthy too. I opted not to use the red border if the player buys a hint, because they're doing that by choice.
Then I used darkgreen to update the screen when the player earned points or won the game. For this I
did a search for score +=, with the word score because we have a lot of text strings that use
+=. It was as simple as adding updateColors("darkgreen");.
Just so you know, if you want to use a very specific shade of a color, you certainly can. You can pass in a hex
code as your color. I use one for a darker shade of slateblue and its code is #2f2475.
Just send it in like anything else: updateColors("#2f2475"); but make sure you include the number sign (hashtag #) in
front.
Step 5: Adding a color property to your rooms
Time for the very last step. Let's give our rooms a color property.
This part's super easy, right? You know what to do? You already know the name of the property that's being called, right? And how to add it to a room? Cool, go for it!
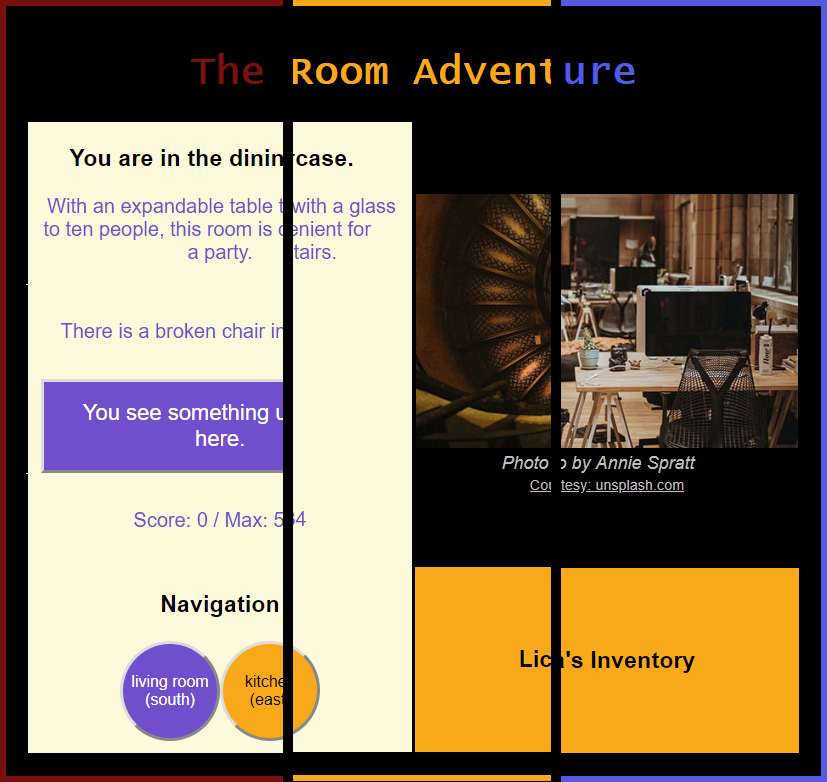
And if you'd like a refresher... Go into your getRooms function. Scroll down to your first room (or whatever room you want to give a color to). For simplicity, insert a line after the name line and put the new property there. If you have an image for your room, then I'd suggest using a main color from that room to add a nice accent to the UI to tie it all in together, but of course, do as you like!
Example
- var livingRoom =
- {
- name: "living room",
- color: "lightgoldenrodyellow",
- //all the rest of the properties continue below...
Don't forget to play the game and see how your colors are working out. Maybe you want to add more px
to the #interface border so you see the color more. Or maybe you want to change the background color
instead. You can figure out how to do that, right? It goes back to the updateColors
function and using the style property.